A Guide To Laying Snap-Together Laminate Flooring
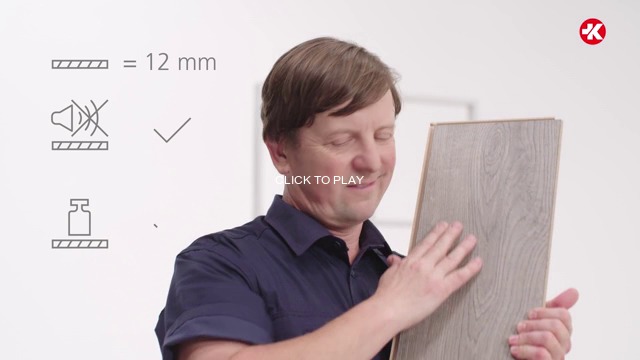
Unlike parquet flooring, there’s no reason not to install laminate yourself. And KRONOTEX flooring is quite easy to lay, even for inexperienced DIYers. The panels use a tongue-and-groove “Clic” system that lets you simply snap panels together without the need for any special knowledge or tools. However, for best results it’s important to follow a few basic rules before and after installation.
Please also read our recommendations on suitable substrates and instructions for installing a vapour barrier and acoustic underlay first.
Movie Clips
#preparations
#underlayment
#cut-and-clic
#special situations
#accessories
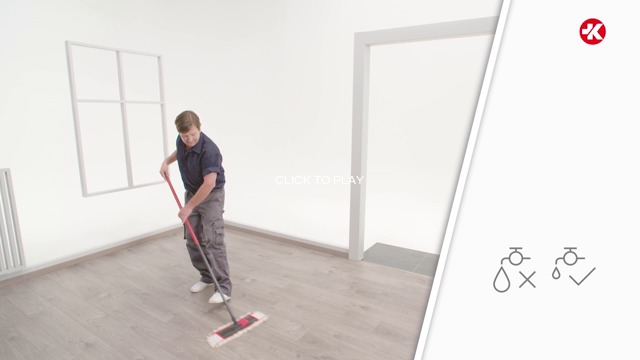
#care & #repair
Transport and storage
Please transport KRONOTEX flooring carefully without removing it from the original packaging. Large quantities should also be stored in the original packaging to prevent damage. If you intend to store panels for a long period of time, please read the tips in our article on storage of laminate flooring.
Getting Ready to Lay
To calculate how many square metres of laminate flooring you will need, measure and multiply the room’s length and width and then add an extra 10% to account for trim. This is very easy to do with the online calculator that you’ll find here on our website for each décor. It also tells you how many boxes you will need.
Acclimate KRONOTEX laminate flooring by storing the unopened packages for at least 48 hours at room temperature (at least 18°C) where it will be installed.
Prior to laying KRONOTEX snap-together laminate panels, check them once again to ensure that they are undamaged, of the right size and identical in appearance when viewed in daylight at the installation site. If you discover any actual defects, please contact your dealer or sales representative right away.
We also recommend that you devote thought to a laying pattern before starting. It’s also very helpful to calculate the panel lengths for the first two or three rows and cut them to size. The panels of the last row shouldn’t be narrower than 5cm. To achieve this, it may also be necessary make the first row narrower.
Tools and Materials Needed to Lay Laminate Flooring
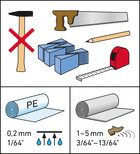
- Pencil, angle, folding rule
- Circular saw, jigsaw or laminate cutter
- Spacer
- PE foil, insulation, Stanley knife or box cutter, possibly sticky tape
- Laminate flooring, skirting boards, transition profiles
Basic Rules for Laying Snap-Together Laminate Flooring
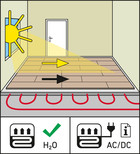
- Lay the flooring at an ambient temperature of at least 18°C, a floor temperature of at least 15°C and relative humidity between 50% and 60%. These conditions should also persist during the first three days after installation. Keep windows and doors closed the room while laying.
- Laminate flooring looks best when laid with the panels parallel to the main light source.
- Before starting to lay, calculate the width that the last row of panels will have. It should not be less than 5cm. This may make it necessary to trim the first row accordingly.
- KRONOTEX snap-together laminate flooring is intended to float on the subfloor. In other words, it shouldn’t be glued, nailed or otherwise fastened. As wood is a natural material, the laminate works and moves. The floating installation and wall gap ensure enough leeway for it to flex and expand slightly.
- Fix skirting boards to the walls, not the floor!
- Please follow the installation instructions precisely. If the flooring is improperly laid, the warranty will be voided. If any problems arise, stop work immediately and contact your sales representative.
Step-by-Step Instructions for Installing Snap-Together Laminate Flooring
After making sure that the subfloor is suitable and letting the laminate flooring panels acclimate in the room for at least 48 hours, you can proceed with installation:
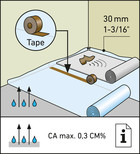
- If you are laying the flooring on screed or concrete, put down a vapour barrier first. Either overlap the sheets of membrane by 20cm or glue them edge to edge. Make sure that they extend up the walls by about 3cm.
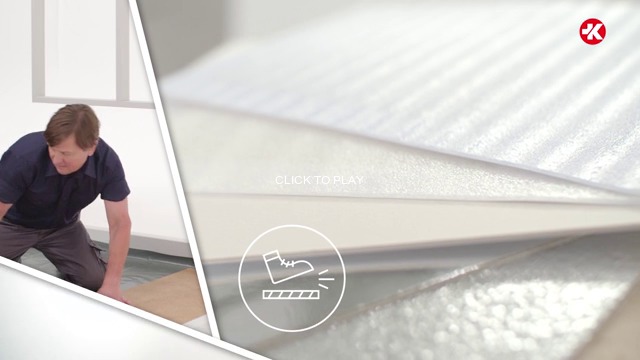
- The next step is to apply an acoustic underlay. Lay sheets of it at 90° angles to the direction that the laminate panels will run and use sticky tape to fix them to one another.
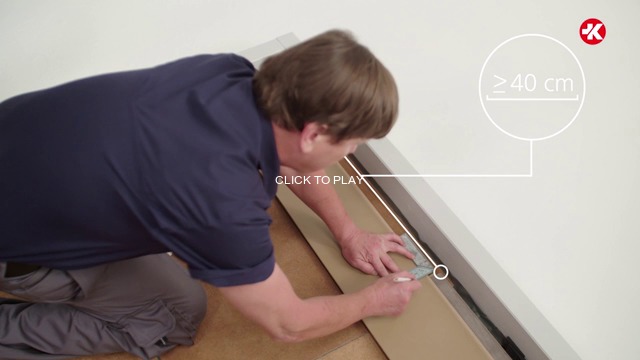
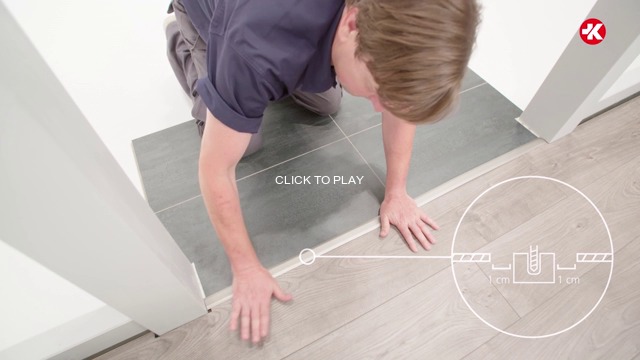
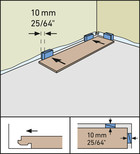
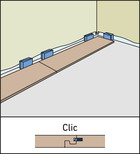
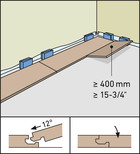
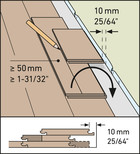
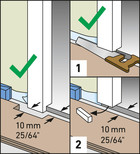
- Lay the first row of snap-together laminate flooring. Start in the right-hand corner of the room and lay the panels so they run parallel to the window or other light source. Lay the panels lengthwise along the wall leaving a gap 10mm wide and snap their short sides together. Wood wedges are excellent spacers. You will almost certainly have to shorten the last panel in the row. To do so, use a circular saw, a jigsaw or a special-purpose laminate cutter. The last piece shouldn’t be shorter than 40cm. It may be necessary to shorten the first panel as well to prevent this (making sure that it is also at least 40cm long).
- Always place panels with the décor side facing down for cutting. Make your marks on the back. Use a circular saw, jigsaw or laminate cutter.
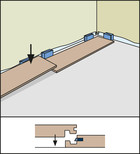
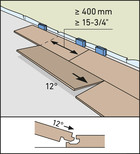
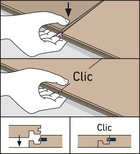
- You can start the next row with the piece left over from cutting the first, provided that it is at least 40cm long. This will result in an attractive stepped pattern. The tongue-and-groove joints in adjacent rows should be staggered by at least 40cm to stabilise them. Insert each new panel at a sharp angle into the edge of the already-laid panel and press it down until you hear it audibly click into place. It’s very easy to do by lifting both up them up a bit at the joint and then pushing down on it until it clicks. The angle is right if you can easily connect the panels without exerting any force. You’ll get the hang of it fast!
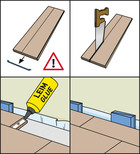
- The last row of laminate flooring will almost certainly be too long, making it necessary to trim it. Remember to leave a sufficient gap along the wall. If the panels there are also too wide, they must be made narrower. Remove the blue springs at their ends and join the panels using a water-free glue.
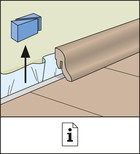
- Before attaching the skirting boards, first use a Stanley knife or cutter to trim excess membrane so it won’t protrude above them. It’s best to cut the skirting boards to size with a mitre saw.
- Transition rails must be mounted between different floor coverings in adjacent rooms. Depending on the type, they have to be glued, screwed or snapped into place.
Special Installation Situations
-
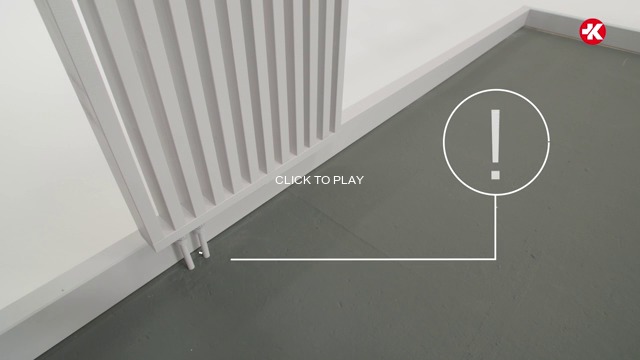
Heating Pipes
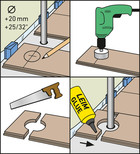
Where heating pipes etc. stick out of the floor, first cut the panel to the right length, then lay it next to where it will go and use a folding rule to measure and mark where the openings are needed. Here too, remember to leave a 10mm gap round them. Now you can use a drill to remove the marked areas. Next, use a saw to bevel the edges of the hole at a 45° angle. This increases the surface area for gluing. Apply D3 glue to the sawed-off piece, place it behind the heating pipe and tightly join it to the other piece of panel.
-
Door Frames
Wooden doorframes should be shortened. Lay a panel next to the frame with the décor side down. Use a suitable saw to sufficiently shorten the frame, then slide the panel under it with the décor side up. With steel doorframes that can’t be shortened, make an appropriately shaped cut-out in the panel instead.
-
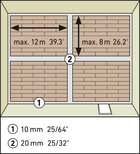
Expansion Elements for Large Rooms
In rooms that are more than 12 metres long and/or eight metres wide, an expansion element is also needed in the middle. This also applies to doorways, archways (doorless openings between rooms), protruding masonry and rooms with complex shapes. You can find out everything you need to know about this in our article on expansion joints.